Showing posts with label recipes. Show all posts

Friday, July 27, 2012

cowgirl cornbread muffins


When I was 18, my dad offered me my first dip of Copenhagen tobacco in a can. I was perched on the fence over looking the pasture that was home to his black Angus cows and he was leaning against the fence post beside me. We had just solved all local and national problems related to politics, economics and morality and I suppose I measured up because, suddenly, an odoriferous mound of spicy sweet grounds were floating beneath my nose. I looked from the can in his massive hand to his twinkling blue eyes and, desperate to prove my grit to the man I admired above any one on earth, took a pinch and plopped it between cheek and gum. Oh merciful heavens, it was nasty. My dad had the decency to keep his gaze directed forward as my eyes began to run, my complexion turned to shades of moss and my facial expressions morphed between brave smile and a highly unlady-like gag. That summer I was home from college marked the first and last time that I got to be a real cowgirl. I was my dads right hand gal. I helped mend fence, went to rodeos, rode a horse, drank coffee that would curl chest hair and blissfully rode on the tailgate of his Ford pickup truck shaking a coffee can full of sweet feed to entice errant cows to mosey on home from feasting in the neighbor's watermelon patch. His favorite dinner was b-b-q brisket, red beans and corn bread dripping with butter. That, of course, was my favorite dinner too.

I lost my dad earlier this year and I sure miss him. I do still have his recipe for red beans and I continue to have a great fondness for cornbread. Cornbread is good with chili, red beans, steak, brisket ---just about anything. Sometimes I make it from scratch and bake it in a cast iron skillet but one of my favorite recipes is Cowgirl Cornbread Muffins. When you've been busy all day roping, branding, herding little dogies or, in my case, crafting, there is no time to fuss over made-from-scratch anything. These muffins are so easy to make and taste so good that you could serve them with a bowl of microwave heated spaghetti-O's and still win the admiration of the folks sitting at your table!
Cowgirl Cornbread Muffins:
1 box jiffy cornbread mix
1 egg ( or egg whites from 2 eggs)
1/3 cup milk 
1/3 cup frozen sweet corn
1/3 cup shredded sharp cheddar cheese
1 4oz. can diced green chilies, drained
Mix batter and pour into a greased 6 count muffin pan. Bake at 400 for 15-20 minutes.

Thursday, May 10, 2012

Chocolate No-Bakes


When we lived in Oklahoma City, one of my favorite lunchtime haunts was a tiny cafe and bakery called Mclarens Pantry. It is owned and run by a couple of robust Scotts women who knew how to feed a crowd. One of the most popular items on their menu was chocolate no-bake cookies. Oh my gosh were they good. Because I have the self discipline of a marshmallow when it comes to tasty snacks, my little girls and I found ourselves in front of the bakery counter frequently at Mclarens. I blame myself for their current addiction. We eventually moved away from Oklahoma and I thought my love affair with chocolate no-bakes had surely come to an end. It was not to be. My daughter, Kristyn refused to be denied her all-time favorite treat so she found a recipe and made them. Bless her soul. There was much rejoicing. While the girls all still lived at home we had a plentiful supply. I never worried about over consumption for myself because the majority of them disappeared practically before I could blink. The girls are all grown up now and have left home. What hasn't left is my deep affection. For chocolate no-bakes cookies, that is. Seriously. It is a dilemma because to make an entire batch produces about 2 dozen cookies. I will eat them. Every last one. They are just as delicious at breakfast time as they are for a little midnight snack. They can really get you through an afternoon slump or fuel your creative juices. You can see where this could lead to unwanted excess fleshiness in time. So, rather than completely severing all contact, I have cut the recipe in half. This has worked out very well because they are so quick and easy to make that small batches here and there won't lead to button popping despair. You just have to give these a try. With summer at our doorstep, they are great for picnics and cook outs. Whip up a batch for the weekend! This recipe makes about 1 dozen so, if you need more, double it. Enjoy!
Click to play this Smilebox recipe
Create your own recipe - Powered by Smilebox
Another free printable recipe card by Smilebox

Tuesday, April 10, 2012

Cookie Dough Truffles


I have been traveling this year. One of my new interests is art journaling. I have gone to several workshops to learn the mysteries of incorporating different mediums and textures to create fun art projects and meaningful journal pages.

One of the best workshops I attended was The Soulful Artist by Donna Downey. 


Not only did I learn, to my relief, that there really is no great mystery to creating really cool art, I also had one of the best times of my life! I met really interesting talented women and, I have to say, Donna Downey is one of the best instructors I have ever had. Not only is she talented but she is insanely funny. If you ever have an opportunity to travel to one of her workshops---GO! Otherwise, click here to check out Donna Downey Studios website. One of my favorite things about her blog is Inspiration Wednesday where she shares a free video on a journal technique. The techniques are inventive and often messy which make them all the more fun. Click here for a peek at Inspiration Wednesday! What does this have to do with cookie dough truffles?
While on the Soulful Artist Retreat, we ladies were fed the most tantalizing fare. Donna's fabulous mother created the main courses which were works of art in themselves. Melissa, shop manager at Donna Downey Studios, won our hearts with her amazing snacks and desserts. Melissa introduced us to Chocolate Chip Cookie Dough Truffles. Wow. I mean, really Wow. Once these little treasures find their way to your mouth there is NO turning back. If you make these at home you will be popular. Your teenagers may even begin liking you again. Your partner will realize, indeed, how fortunate they are to have you.You may get a raise at work. Sadly, you may not look like a swim suit model once you start eating these because overindulgence is a risk. But, who cares? So, I am happy to share with you the link to Chocolate Chip Cookie Dough Truffles recipe which is brought to you by Love and Olive Oil. You may also find yourself falling in love with the entire Love and Olive Oil site.
I must confess that I am thoroughly enjoying a truffle right now as I write to you.
Art with Donna and Cookie Dough Truffles--- Life is good.

Thursday, December 8, 2011

cinnamon chip scones

The holiday season is upon us! Here is a simple recipe that is sure to bring comfort and cheer to any morning or tea time snack. These freeze up really well so you can put some away for holiday mornings, gatherings with friends, or when things get a little hectic and you need a delicious treat to calm the nerves. Hope you are all having fun!
Cinnamon Chip Scones:
2 cups flour
1 TBSP baking powder
1/2 cup brown sugar
1/2 cup cinnamon chips
3/4 cup chopped pecans
1 1/4 -1 1/2 cup whipping cream
mix all ingredients with a spoon. Dust your hands with flour and knead the mixture 4-5 times. pat out into a nice fat circle on a cookie sheet. cut into pie shapes while keeping the circle intact. It will look like a wheel. If you have a scone pan then just pinch off pieces of the dough and place them in the pan. Brush the top with melted butter and sprinkle with cinnamon-sugar.
Bake at 425 for 15 minutes or until golden.
You are just going to love these with a hot cup of coffee or tea!

Tuesday, November 22, 2011

quick thanksgiving dinner for a smaller crowd

I hope you all are enjoying the beautiful crisp Autumn days we have been having. This is my favorite time of the year! The food, the gatherings, the upcoming holidays----I have been busy in my craft room and kitchen creating all sorts of goodies for the holiday season. In fact, that is about all I have managed to get done since it now gets dark at 5:00! My brain has no interest in what time the clock says, it faithfully shuts down every day as soon as the sun begins setting. I can hardly believe it is time for Thanksgiving. I hope you all have a lovely holiday with friends and family. If you have a small gathering this year, here is a recipe that you make in the slow cooker that is simple and delicious. Thank you, Carol Sherwood from Batavia, NY for inventing such a savory delight!
Slow Cooker Turkey and Dressing:
1 box stuffing mix
1/2 cup hot water 
2 TBSP softened butter
1 chopped onion
1/2 cup chopped celery 
1/4 cup sweetened, dried cranberries
3-lb. boneless turkey breast
1/4 tsp dried basil
1/2 tsp. salt
1. Spread stuffing mix in greased slow cooker ( I use butter)
2. Add water, butter, celery,onion, and cranberries. Mix well.
3. Sprinkle turkey with basil and salt. place over stuffing mixture.
4. Cover. Cook on low 5-6 hours, or until turkey is done but not dry.
Serve and enjoy! 
Happy Turkey Day!

Friday, October 7, 2011

Fall Is Here- Time For Pumpkin Bread!

One of my favorite Autumn memories was watching my mom pull steaming cans of pumpkin bread from the oven when the leaves began to fall and the air turned chilly. Cans? Yes, she baked pumpkin bread in coffee cans that had been saved and rinsed out. She would bake some for us and then give a few cans to friends as a gift. Tape a piece of pretty paper around the can, replace the plastic lid and presto, the perfect gift container! If the domed loaves baked for us had lasted longer than the 10 minutes it took for them to be reduced to a few mere crumbles, they would have stayed fresh right in the can with the lid on. The warm half moon slices Mom served up with a nice spread of butter were beyond delicious and became a tradition that I carried on to my own family. Since coffee cans became generally plastic some years ago, I began baking the same recipe in mini loaf pans. My oldest daughter was at home recently and asked if she could borrow my coffee cans so that she could bake pumpkin bread at her house. She was a little sad when I told her that I had switched to mini loaves. The taste is the same, it is just that the memory of those sweet little cans coming out of the oven somehow became part of the tradition. There are some coffees that still come in tin cans but not many. I was pondering this dilemma while I was baking today when my eye settled on the empty 29 oz. tin pumpkin can sitting in the sink. Could it be? Hark, I think I may have found a coffee can alternative! Minus the lid. Plastic wrap works. I emptied a few more cans, filled them up with batter and, with great hope, placed them in the oven. It worked! Happy day! The delicious little half moons of my childhood pumpkin bread memories have returned. I think my girls will be pleased as well!
Here is the recipe my mom used all those years ago that has still remained a family favorite.
Pumpkin Bread
Mix:
3 cups sugar 
1 cup veg. oil
2 1/2 cups canned pumpkin
4 beaten eggs ( I use 3/4 cup egg whites)
1/3 cup water
Add:
3 1/3 cup flour
3 tsp. cinnamon
2 tsp. nutmeg
2 tsp. soda
1/2 tsp. salt
1 1/2 cup chopped pecans or walnuts
Blend all ingredients together.
Grease and flour ( or use Baker's Choice or Pam baking spray) 4 one pound coffee cans or 
4  29oz. tin pumpkin cans or 4 mini loaf pans.
Divide the batter into the 4 vessels of choice and fill 2/3 of the way full.
Bake at 350 degrees for 50 minutes to 1 hour depending on oven. 
(a wooden toothpick inserted into center of bread will come out clean)
Let stand for 15 minutes and then remove from loaf pans/ cans.
This recipe freezes beautifully and the smaller size makes such a nice little gift---that is, if it makes it out of your kitchen!


Thursday, September 8, 2011

Carrot Cake in Miniature

Sometimes I find the most challenging issue when cooking for two people is dessert. I really adore desserts but, since the kids have grown up and flown the nest, dessert portions are too big. I don't need an entire cake hanging around. I will eat it. For breakfast. A little snack. Lunch. A treat for getting the laundry done. And of course, a sweet for after dinner. One evening I really wanted to bake a carrot cake. I have certain food allergies, specifically egg yolks and vanilla bean, which puts a kibosh on most bakery items from the store. If I want to enjoy a piece of cake without paying an unpleasant price later I need to make it myself.
SO CUTE!
I got out my favorite recipe for carrot cake and started doing the math. I only really needed a quarter of the recipe for the two of us. Some measurements were a bit of a guess but,what the heck--it will turn out or it won't. I baked the cakes in two 4 1/2 " ramekins. I am sure that anything up to about 6" would be fine. I then stacked and frosted them. Just the perfect size for two and delicious! I could hardly wait to share my recipe with all of you!
Here it is:
Wee Carrot Cake for Two:
1/2 cup flour
1/2 cup sugar
1/2 tsp. baking soda
1/2 tsp. cinnamon
pinch of salt
egg whites from 2 eggs
1/3 cup vegetable oil
1/2 tsp. imitation vanilla
3/4 cup grated carrot
1/4 cup pecans
Preheat oven to 300 degrees.
Mix oil, sugar and eggs. Add dry ingredients. Mix. Add carrots, nuts and vanilla. Pour into two greased
4 1/2 inch oven safe ramekins. bake for 30 minutes or until tooth pick inserted to center of cakes come out clean. Allow to cool and then frost.

Cream Cheese Frosting
1/4 cup softened butter
4 oz cream cheese
8 oz. powdered sugar
1 tsp. artificial vanilla
tiny pinch of salt
1/4 cup chopped nuts
Blend all ingredients except nuts and spread between layers, on top and sides of cake. Garnish with nuts. Refrigerate.

I hope you enjoy this as much as we did! I am also excited to have a new distraction---creating Sweet Morsels in Miniature! I will share them with you as I bake them!
Bon Appetit!


Monday, August 29, 2011

Delicious Barbecue Brisket

 Summer is yawning and nudging Autumn to come wrap us up in her colorful cozy quilt. Can you sense it? Although my friends down south are still sweltering in the heat, the weather is beginning to cool here in Ohio. We are sleeping with the windows open more often. The high school band can be heard rehearsing in the distance. School buses make getting to town a sluggish affair. The last vegetables are in from the garden and their green stalks are weary and fading. The bag of charcoal on the porch is empty. I don't know about you, but I am ready to put the garden to bed for the season and I'm just about done grilling outside for awhile. I always love winding the summer down with a barbecue dinner. There is something so gratifying about piling up a plate with barbecue brisket, sweet corn on the cob, sliced tomatoes fresh from the garden (or from the grocery store is just fine), and buttermilk biscuits dripping with butter and honey. I usually top it off with the peach cobbler that I posted about previously. A splendid summer wrap-up.
My dad still makes the best barbecue brisket I have ever eaten. He spends hours smoking the meat on his charcoal grill---always keeping a watchful eye lest his masterpiece be less than spectacular. It is always spectacular. He then slices it, places the tender smokey succulence in a pan, bathes it in just enough barbecue sauce, covers the pan with tin foil and cooks it in the oven for a few more hours. I love his barbecue---I just do not have the skill or patience to replicate it. Long ago, my mother came to my rescue with a fabulous recipe that is just mouth watering. It could never be as good as dad's but it certainly does satisfy the taste buds just fine. The perks to this recipe are that it is simple to throw together and it does not require grilling or smoking the meat beforehand. Love it!
 So, as a "so long to summer", here is my tried and true recipe for barbecue brisket:

Blue Ribbon BBQ Brisket:
4-8lb brisket
1/2 tsp salt
1 tsp. garlic powder
1 tsp. celery seed
1TBSP onion powder
1 TBSP black pepper
1 TBSP liquid smoke
 2 TBSP Worcestershire sauce
1-2 Cups of your favorite barbecue sauce
Place brisket in an oven safe pan
Mix all other ingredients--pour over brisket---cover and marinate 6-8 hours or overnight in the refrigerator
Cover with heavy foil and bake at 350 degrees for 3 hours.
Uncover foil for the last 10-15 minutes of cooking time to brown.


Wednesday, July 27, 2011

Lake House Peach Cobbler

I have always been very fond of peach cobbler. I have tried a number of different recipes over the years, many of them time intense and complicated. I came across this simple delight about 15 years ago and, hands down, it is my favorite. It receives rave reviews any time I serve it and goes well with just about any meal. I always keep a can of peaches in my pantry because it is also terrific for those last minute occasions!
It is perfect for our Lake House state of mind because it is SO simple. I hope you enjoy it as much as we do.
Peach Cobbler
1 stick butter
1 cup flour
1 cup sugar
1 1/2 tsp. baking powder
pinch of salt
3/4 cup milk
1 15oz can sliced peaches in light syrup
Preheat oven to 350.
Melt butter in casserole dish while oven is preheating.
Mix together flour,sugar, baking powder, salt and milk.
Pour over melted butter---do not stir!
Pour entire can of peaches,including juice, over mixture. Again, do not stir!
I sprinkle the top with cinnamon-sugar and bake in the oven for 30-45 minutes or until crust is golden. 
Fantastic served warm with a nice dollop of vanilla ice cream!


Thursday, April 14, 2011

White Chocolate Snack Mix

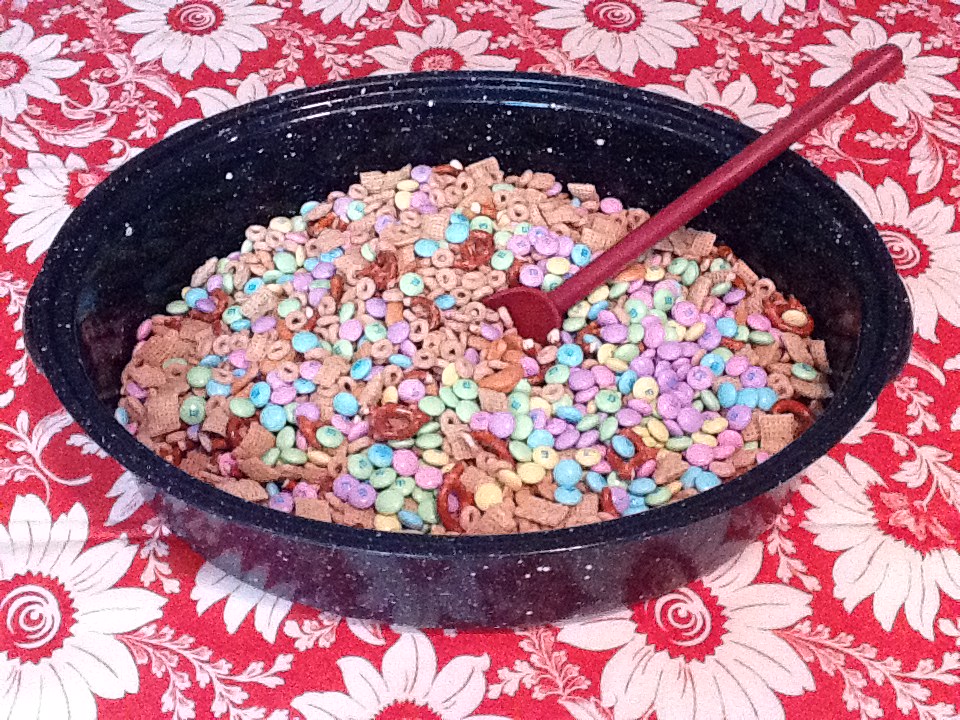
White Chocolate Snack Mix
A few years ago I discovered this sweet addiction at a Holiday Open House.

 I made up a batch and sent it off with The Mister to his holiday pot luck at work. It was a hit! The next year the ladies he works with requested that he bring back another batch as his pot luck contribution. These women are truely such special people so I happily whipped up enough for each shift to munch on. Since then, this salty/sweet confection has brightened parties, pot lucks and college care packages. I enjoy making it because I know folks are going to enjoy eating it! It is super easy and quick to make. In the past, I have made batch after batch to celebrate the winter holidays.
I can't wait until winter. 

I'm thinking--spring is a holiday! 
I'll just substitute pastel colored M&M's and, PRESTO, Spring White Chocolate Snack Mix. 
Try it!
You will love it and so will the lucky special someones that you make it for.
   Here is the recipe:
White Chocolate Snack Mix
1 10 oz. pkg. mini twist pretzels broken up a bit
5 cups Cheerios
5 cups Corn or Rice Chex
2 cups salted cashews
1 14 0z. pkg. M&Ms
2  12 oz. pkg. white chocolate chips
4 tablespoons vegetable oil
 1. Combine pretzels, cereals, nuts, and M&Ms in a large bowl. I 
     use a big turkey roaster.
2. Melt white chocolate chips and oil in pan over low heat until 
    smooth and creamy.
3.Pour melted white chocolate over cereal mixture and stir.
4. Spread onto 2 baking sheets that have been lined with 
    parchment or wax paper. 
    Allow to cool, then, break apart into course clumps of 
    taste bud happiness!
    Store in an air tight container.
                           How easy is that?
                                  Enjoy!