Showing posts with label crafts. Show all posts

Monday, July 9, 2012

"Alis volat Propiis" T-shirts

Arts and crafts summer is still in full swing and I thought it would be fun to design a t-shirt.
Meet my daughter, Kristyn. Isn't she a sweetheart?

 My 3 daughters and I have been so excited about our new  Fe++  Butterfly "We are stronger than we look" attitude that we wanted a t-shirt to remind us that, not only are we strong, but we must strive to live authentic lives that we create from our own passions and dreams---"alis volat propiis"which is Latin for "she flies with her own wings". We like Latin because it is different and sounds intelligent  and we think that being different and intelligent is beautiful.

We are loving the shirts so much that we want to share them with all of you! We want women everywhere to remember how strong, beautiful and unique they are. T-shirts are now available in my Etsy store. Sizes are L, M, S and XS. You can directly access Fe++  Butterfly Creations by clicking the Etsy store badge at the top of the left side bar. I am offering my blog readers a 15% discount if you use the COUPON CODE: BUTTERFLY at the time of your purchase.
I drew out the iron butterfly image and then collaborated with silkscreen artist, Gabe Taxman of ARTEE (website coming soon) to print it onto super soft 55% cotton/45% polyester burn out t-shirts. Boy, are they ever comfy and cute to wear. I like that I don't look like a cardboard cereal box when I wear it and yet the shirt is not so form fitting that I look like an over-stuffed pillow, if you know what I mean. T-shirts are made in the USA by Bella, a company that is committed to social and ecological responsible manufacturing.
You, too can create a t-shirt.You can create original art work and transfer the image onto just about any fabric wearable or home decor. You don't have to have access to a silkscreen artist. You can scan your own design onto your computer and print it onto an iron-on transfer. Iron-on transfer sheets that are made for computer use can be found at most hobby and craft stores. Iron your creation, using manufacturer's suggestions, onto t-shirts, aprons, tote bags, pillows and anything else you dream up. I hope you are all enjoying a lovely summer and are remembering how beautiful, authentic and strong you are!

Thursday, June 28, 2012

Dress Up Your Table With Ric-Rac Cloth Napkins


I love summer gatherings. Especially when good food and fun casual table settings are involved. When hosting small events (12 people or less), I like to use cloth napkins. They are cheerful, earth friendly, and just feel nice. I came across today's tutorial for the most darling napkins last year but never found time to make them. I finally drug them out of my unfinished project drawer (well, some would say it is actually a closet) and made them for a class I hosted at my house last week. I love them and just have to share them with you! They are a little tricky to make because of the ric-rac, but so worth the little bit of extra concentration. Here is the link to the tutorial on one of my favorite blogs, The Purl Bee. Purl Bee Ric-Rac Napkin Tutorial Actually, I found that after a little trial and error, the ric-rac is much easier to work with if you use the medium or jumbo size. If you are looking for a way to add flair to your picnic, cookout or get-together, you cannot go wrong with these cuties. They also wash nicely and do not require ironing!

Tuesday, June 12, 2012

Tile Coasters


Summer is a time for frosty beverages. Here is a little tutorial for some gorgeous coasters you can make using natural stone tiles. These make wonderful hostess gifts or favors for a garden party, too.

Supplies:
natural stone tiles ( I used travertine tiles because I love the natural imperfections)
StazOn Ink (craft store)
rubber stamps
sticky back felt pads

Here we go!
First, make sure your tiles have a clean surface. I washed mine off and left them to dry over night.


Place your rubber stamp face up on a flat surface. If you are using a stamp without a wood back, use an acrylic stamp block or a rigid surface.

Ink up the stamp with a StazOn Ink pad or any other permanent ink. I find I have better success if I pounce on the ink rather than rubbing it on.

Place your tile face down on the stamp and press firmly.

Pretty!

Bake at 350 for 30 minutes. This sets the ink so you don't have to seal or treat the finished tile.


Add sticky back felt pads to back.

Done!

These are so fun to make! You are seriously going to love them. See you next time!

Monday, May 28, 2012

shop girl apron


Our youngest daughter is home from college so, for our family, summer is officially here! My family and friends know how I love to have a summer theme. Why? I don't know. It is just fun and gives me something to plan for and share with everyone else. My friends and I get excited. My daughters become wide eyed and wary. But even they eventually succumb! This year is going to be an Arts and Crafts Summer! I will be sharing all kinds of simple fun projects as well as recipes and ideas. I hope you join us. It is going to be a lot of fun! What better way to start Arts and Craft summer than with this darling shop girl apron? I first saw this little gem when my friend, Kori Turner of Olive Grace Studio, made them for a fabulous bus trip she organized a few years ago. She had tied an apron around the back of each seat so the pockets faced the person behind and filled it with all kinds of trip goodies. Genius. It is incredibly simple and so functional. I wear mine all the time. It can be worn to craft in, to garden ( especially if you need to carry an epi-pen and cell phone), to stash away loose little treasures you find while cleaning up the house and, of course, to be shop girl! Wouldn't you be snazzy wearing this at your yard sale or when it is your turn to work the concession stand or community tag sale! Kori has kindly agreed to share with us how to make the shop girl apron so grab some fabric and let's get started-Arts and Crafts Summer has begun!
Supplies:
2 fabric fat quarters or 2 pieces of fabric approx. 22 in X 18 in
2 yards cotton twill trim or your choice of trim for apron ties
Directions:
1. Fold twill trim in half and cut. You will have two 36 inch lengths for apron ties. On one end of each tie, fold raw edge under 1/4 inch then fold again another 1/4 inch. Stitch in place. Leave the other two end edges raw.


2. Place 2 fabrics right sides together. The 22 inch measurement will be the length and the 18 inch measurement will be the width of your apron.
3. Fold the top fabric back and down approx. 6 inches to expose the fabric underneath..
4.  Measure down 3 1/2 inches from top of the fabric underneath and place twill ties with raw edges meeting raw edges of the fabric. Pin in place. Sandwich the 2 ties in-between the 2 fabric pieces towards the middle so that they don't get caught in seam stitches.
5. Fold top fabric back up to meet raw edge of fabric underneath. Pin in place all around the apron.
6. Beginning in right lower corner, stitch a 1/2 seam around the apron until you are approx. 3 inches away from the point that you started. Stay stitch and remove from sewing machine. This will leave an opening to turn your fabric.
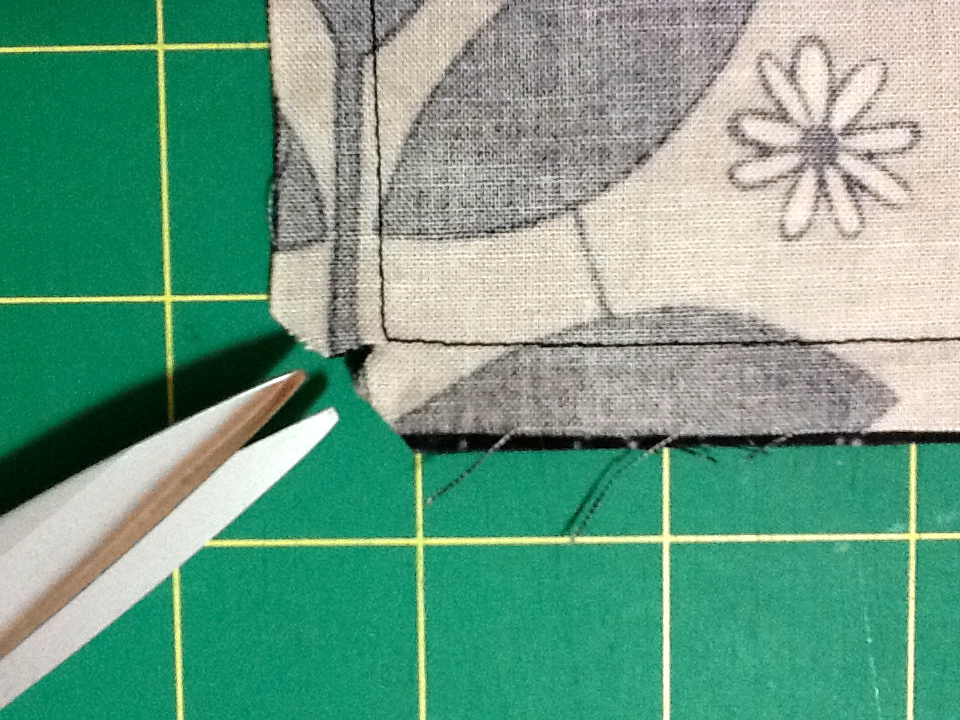
7. Clip corners and turn inside out through opening. Press.
8. Lay the apron face down and fold the bottom up to just meet the bottom edges of the 2 apron ties. Pin the sides of the apron and sew close to the edge. This will close off the opening you used to turn the fabric.
9. Measure down the middle of the large pocket you have just created and mark. Using the mark as a guide, sew down the middle of the pocket stay stitching at the beginning and end. This will create two roomy pockets.
10. You're done! Put on your new shop girl apron and enjoy! Gee, you're cute!
This pattern could easily be cut down to fit a child. It takes about 1/2 hour to make.
Here is another  shop girl apron idea using recycled jeans!
So darn cute! 
If you just don't want to make a shop girl apron but would like to have one, check out my Etsy Shop for aprons and apron kits.
Have a good week!

Wednesday, August 17, 2011

Nifty Swifty

Was that bad to do? Sorry.
The fabulous gals from  Mason Dixon Knitting have done it again! In their second publication, Outside The Lines, a pattern is offered that I could not resist. Do you remember the darling ball-band dish rags that I mentioned in an earlier post? The ladies have figured out how to turn that rag into a cover for our Swiffers! It is my opinion that the "swifty" picks up hair, crumbs, dust, ect.... much better than the disposable covers you buy at the store. More importantly, they are TOO CUTE! Don't you think? No more buying box after box of paper covers for me! I knit up two: one that adorns my Swiffer and a second that is in the wash or linen closet---waiting to transform what was once an ordinary household tool into something fun and fabulously chic. The first Swifty knit up quickly. The second, well, as you can see, I had help so it took longer. I used Sugar and Cream 100% cotton yarn by Lily. The yarn can be found in craft stores or the craft section of Walmart for about $2.00 a ball. I used 4 colors (4 balls) and could have easily knit 3-4 swifties from the 4. The book is full of fun useful projects and the clever wit of Kay Gardiner and Ann Shayne will keep you laughing! I love these ladies!!!  Here are Kay and Ann starring in a little video they created that perfectly captures the zany sense of humor the knitting books are so full of.

When I finally stopped laughing at the video, I decided it was time to make pickles!


 I chose cucumbers for my experimental veggie in the garden this year and discovered that, on any given day one may find 8-10 pounds of pickles gracing vines that one could have sworn were not there a few days ago. So, thanks to my daughter, Sarah and her friend, Hannah, we washed, sliced, boiled, spiced and canned 14 pints of Kosher Dill and Bread and Butter pickles. In my normal fashion, I did not read the recipe from the Ball recipe book all the way through before beginning the process and was a little deflated to find that we would have to wait 6 weeks to sample our efforts. Oh, well. In 6 weeks I will share recipes if they turn out!
In the mean time---I'm off to my craft room to create something pretty!
Don't forget that you can click on the highlighted words to be transported to the Mason-Dixon website
and Amazon for the book!


Wednesday, August 3, 2011

Hex Nut Bracelet

My youngest daughter,Sarah, made me this very cool bracelet and I LOVE it! It is made from hex nuts and hemp.
So clever. So inexpensive. so hard-ware chic. Click here to view the website with instructions for making your own bracelet. Thank you, Sarah, for keeping us all up to speed on hip adornments!
As you can see, I have been having fun in my craft room. However, I am having a difficult time finishing anything and this is why:
Meet Chloe.
She wandered into our next door neighbor's yard 3 weeks ago. She had recently had puppies as evidenced by certain sagging swinging lady parts and she was infested with fleas. She was so thin and very scared. Anytime someone would approach her, she would cower and crawl. Our wonderful Neighbors posted signs, advertised on several far-reaching web sites and posted in the local papers but no one seems to be looking for her. The vet said she is probably between 2-4 years old and puppies would have been about 8 weeks old and weaned. He felt she had been running free for at least a week and there was a strong possibility that she had been abused and was most likely "dropped off". She is such a tiny fragile looking little thing. He was amazed that she had survived the hawks, coyotes and foxes that frequent the woods in our neighborhoods. She certainly is brave and resourceful. The Neighbors kept her for a over a week and had her bathed for the fleas. The Humane Society would not take her because she was not injured or bleeding so, unfortunately, the next stop was going to be the pound. The Neighbors travel for months at a time and could not keep her. I don't know what happened but my heart just melted for this little gal and so I brought her home on a trial basis. She and Ky would have to be okay together and I wanted to make sure that she didn't have any severe personality issues. She is the sweetest thing and I just adore her. She follows me everywhere and is very cuddly! I still search the papers for lost adds but am secretly relieved when there are no postings for her. I am quite baffled---I thought I didn't like small dogs! Well, Chloe is rehabilitating nicely and I am reformed.
So, I have been spending a lot of time acclimating Chloe to her new home instead of being domestic but I am good with that.
Speaking of domestic, I have a cleaning tip from my friend, Vicki:

For those of us at a certain age who must rely on mega-magnification mirrors to apply our make-up, pluck brows or observe for undesirable growths----DO NOT clean the mirror. It is perfectly acceptable to leave that film of hairspray and random fingerprints as long as the rest of the bath room is clean and tidy. Removing this film might reveal realities that we just aren't quite ready to embrace yet. Vicki said that she made the mistake of cleaning her mirror not long ago and received quite a shock. So, thank you, Vicki for another encouraging and helpful hint.

Thursday, June 30, 2011

from the herb garden

One of my favorite things to do in the summer is to work in my herb garden. Every year, I read about new herbs and their possible uses. Then, I pick three or four of my favorites and add them to the garden. Fresh herbs taste so good in just about anything edible and their wonderful aromas keep me smiling. Lately, I have been exploring other herb uses. Have I ever been having fun in the kitchen mixing up fragrant concoctions that aren't just for cooking! After a long hard day, there is nothing quite as nice as a long luxurious soak in the tub. I mean the kind of bath that when you sink down into the warm steamy depths there is nothing more to say than--- Ahhhhhhhhhh. Add a few extra ingredients to that bath and you will feel the stress, aches and fatigue of the day melt away. Surprisingly, the extra ingredients I am speaking of have nothing to do with adult beverages. I would like to introduce you to my new bath time favorite----bath tea. I researched all sorts of herbal bath recipes and came up with an ingredient combination of my own. I call it a bath tea because, once the ingredients are mixed, I scoop it into tea pockets that you can find at most specialty tea shops. I got mine from Teavana. I have included some of the supposed benefits of each herb just for fun. Who knows, maybe there is something truly therapeutic in the use of herbs and aromatherapy! If nothing else, the fragrance is divine and the salts soothe my achy muscles.
The mixture is very simple to put together and the results have me wanting to take baths several times a day.
Aromatic Bath Tea
1/2 cup Epsom salt
1/2 cup sea salt
1/4 cup baking soda
3/4 cup total of any or all of these fresh herbs
       Basil- relieves mental stress
       Sage- restores energy. Used in the bath to relieve labor
                   pains and the discomforts of menopause.
                  Supposedly, sage incites wisdom so I added 
                  extra.
       Rosemary- relieves mental fatigue and sore muscles
5 drops Geranium Essential Oil- calming, balancing,uplifting
                                                effect
5 drops Sweet Orange EO- calming. Promotes happiness. 
                                          Let's just make that 8 drops.
10 drops Lavender EO- relieves stress, headache,muscle
                                    soreness, and insomnia


Mix all ingredients together in a food processor (this chops the fresh herbs. I put in leaves and stems)
Spoon into tea pouches and fold over the flap. You could also use muslin bags with tie strings.
Hang the bag from the faucet of your bath tub and let the warm water flow through it.


Enjoy being swept away to a steamy fragrant ambience of bliss and relaxation! 
When you are done, toss the tea bag containing the fresh herb remains in the compost pile.  
Hope you are having a wonderful summer!

Tuesday, May 3, 2011

A good day to Ruche

Today it is cold and rainy so I have a fire in the fire place to chase away the damp and drearies.
This is my buddy, Ky, who is hoping that I will hurry up and sit down for a minute so that she can relax a bit. Today is a good day to play with a new technique (new to me!) that I learned at Workt By Hand. Ruching! Ruche (roosh) is an ancient french technique which means to plait or gather. I am going to give you a little tutorial on this fantastic embellishment.
No sewing machine required!
Basically, you take a strip of ribbon or fabric, place a running stitch through it in a triangular pattern, and pull the thread to gather the stitches. This forms little scallops or petals. Really really simple and so sweet. Ready to try? Here we go!
Click on the pictures if you would like a closer look.

For demo purposes I will use a length of ribbon

1.   Thread a needle with regular thread (color of thread does not matter) and knot the end.
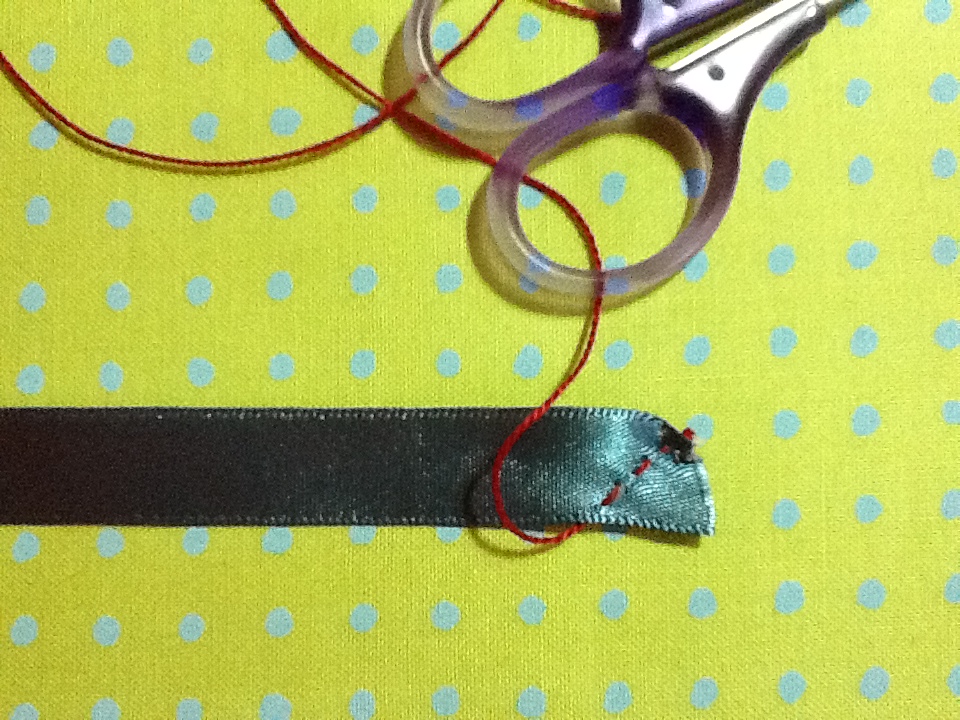
2. Beginning at the top corner, bring the needle up through the back of the strip and sew a basting stitch diagonally to the bottom of the strip. The width diagonally can be wider or narrower depending on how large you want the scallop to be. Note here that I ended my stitch on the back side of the ribbon. I am now going to bring the thread from the back and over the top to begin my next set of basting stitches diagonally back up to the top.
3. See how the stitches form a triangular pattern? Note that here, I have ended my stitch on the front side of the ribbon. Now, I will take my thread from the front of the ribbon under to the backside and begin my next set of stitches. It doesn't matter a bit where you end stitches--either the front or the back--just remember the appropriate starting point for your next stitch set.
4. Every 2-3 triangles you will want to pull your thread to gather the strip. You have just ruched! Continue ruching until you have gathered your strip to a desired length.
Rouching Fabric Strips
If you do not want frayed edges you will need to press and fold your fabric strip to encase the raw edges.

Use the same method of stitching and gathering.
So sweet!

I am using my ruched fabric strips to create little blossoms on my Workt by Hand project.
Here, I have ruched ribbon and couched it with bullion stitches. It is going to be a little tree on another project I am working on. I think the bullion stitches look like little pink and purple blossoms!

I love to ruche. It sounds ever so fancy too.
"What are you doing there, Lisa?"
"Oh, I'm just sipping tea and doing a touch of rouching."
 Thoroughly sophisticated, right?
I just think the possibilities are endless----what have you ruched? I would love to see your ideas!

Saturday, April 23, 2011

Feather their nest with flair

Joy ,oh, joy! The sun is shining and my magnolias are beginning to bloom! I adore magnolia trees. Their sweet aroma makes me smile and linger in the garden just a little longer. I also love watching all of the cheerful little birds that find their way to my back yard. For years I have saved the snippets from my knitting, sewing, stitching and quilting projects through out the winter in an old Ball canning jar.  When nesting season begins, I place some dryer lint along with tidbits of yarn and string in a small wire bird feeder and hang it out for my new feathered neighbors to use in their homes.Even the birds seem to have a flair for the domestic! It is so much fun to find empty nests later in the season that have been adorned with the bits of brightly colored fibers my resourceful little friends have used from my "snippet stash"! This is a fun and simple project that provides a way to recycle and repurpose. It is fun to do with children as a spring activity. Try it! You will like it and so will the birds that take up residency in your own back yard! What garden ideas do you have to welcome spring?

Monday, April 18, 2011

home made laundry soap

Today is one of those days. According to my to-do list I should be cleaning up the house. I don't want to.
Instead, I am enjoying a cup of coffee while flipping through the pages of the April addition of Southern Living Magazine. All of the delicious recipes and pictures of cottage gardens make me think of planning my garden. This inspires me to look at my to-do list again. No garden planning listed. Then I decide it would be fun to put together the college care package I was planning to send to my youngest in Colorado. Ahhhh---mountains, fresh air, fresh smells--- Oh! one of the care package items is the cutest laundry bag---I know, I'll make a little bag of great smelling homemade laundry soap to tuck into the package. Of course, I'll need to make some cute little tags to adorn that little bag of soap. Oh how the mind wanders.
Here is my recipe for powdered laundry soap. It is easy, economical, safe for the environment and a lot more fun to make than cleaning house! I use this in my front load HE machine and it works great.
Lavender - Orange Laundry Soap
1 cup  20 Mule Team Borax
1 cup  Washing Soda ( not baking soda! You can find it on the laundry detergent isle)
2/3 bar Fels Naptha or plain Ivory soap - heck, just throw in the whole bar--who wants a 1/3 bar of soap hanging around!
5-10 drops lavender essential oil
5-8 drops sweet orange essential oil
Cut up bar soap into course chunks with a knife. Put all ingredients in a food processor and blend.

That is all there is to it. Now that I have thoroughly distracted myself from doing what I should be doing, I'll go give that list another look!

Sunday, April 3, 2011

These are darn cute and fun to make

Do you knit? If you do, you will love these darling and very useful Ballband Dishcloths! They are so cheerful and nice to use that you may not even mind wiping up a mess here or there. Maybe wash a dish or two. You can knit them up in a snap to grace your own sink or to give to some lucky someone as a little present. They are a fantastic addition to a house warming gift! These sweeties are thick, absorbent and suds up in the most satisfying way. The pattern can be found in a book called Mason-Dixon Knitting by Kay Gardner and Ann Shayne. These two women are a riot and, I must warn you, more time may be spent laughing at the delightful humor in this book than knitting. Check the library. Even if you just go to the book store and thumb through the pages ---you will find yourself smiling,possibly giggling out loud and most likely yearning to knit a dishcloth or two! Check out mason dixon knitting.
I made the Ballband Dishcloth with Sugar and Cream 100% cotton yarn that can be found at Walmart or just about any store that carries crafts. Happy knitting!

Sunday, March 27, 2011

linen water adds a special touch

Who in the world really enjoys ironing? There was a time when I would have rather done anything else---it was so tedious and boring. However, the Mister has to wear dress shirts and slacks to work every day and there was a time that a weekly trip to the dry cleaners was just not in the budget. Why did he have to refuse to wear any other fiber than cotton? Oh, no-- he couldn't conveniently be Mister Blend--he insisted on being Mister 100% Wrinkled Up Cotton. Well, I love him so I embarked on a quest to find a way to make the chore less mundane. Visions of pink hair rollers and soap operas invaded my fantasies of Audrey Hepburnish ways to make the ironing experience chic. One day, I came across an article about linen water. Hello! That sounds chic. I searched everywhere for this elusive tonic. I had to find it! I did. Wow. It was a real pocket book shrinker. Exit Audrey Hepburn--enter pink rollers and soap operas. I was feeling defeated when I chanced upon a book that had home recipes for cleaners and such. In the laundry chapter was a recipe for lavender linen water! I triumphantly went out and easily found the ingredients and made up a batch. I spritzed the Mister's shirts and applied the hot steamy iron. I was instantly enveloped in the luscious aroma of lavender fields. It was therapeutic even. I ironed one shirt and then another. I didn't hate it. It was a miracle. I couldn't stop. I even ironed a few pillow cases. There was so much steam at work I think I gave myself a facial. Best yet, the room I ironed in smelled fabulous the entire day. Well, I must say, that now I actually enjoy pulling out the old ironing board. The Mister is thoroughly spoiled and loves the way his shirts smell. I even heard one of my teen age daughters say, "Ahhh, so this is what love smells like!" when she layed her head on her pillow one night after a grueling day of high school. She didn't even like me all that much at the time. Who knew it would matter? It did, and I've been spritzing and steaming ever since.
 If you would like to give it a try, here is the simple recipe:
Lavender Linen Water
1/8 c. vodka    yes,vodka. It emulsifies the oil & water and acts as a preservative. I buy cheap $4/bottle brand at the grocery store.
1/2 tsp.(50 drops) lavender essential oil   Find at Whole Foods or health food store
5-10 drops peppermint essential oil (optional or try other essential oils!)
2 1/2 c. distilled water    Tap water has chlorine which destroys the essential oils
Pour into a spray bottle, shake, spritz and steam. Ahhh--heaven!
If you still don't give a hoot about ironing, you can spritz the linen water on bed linens, towels,napkins--you get the idea--without ever touching an iron and still enjoy the soothing aroma of "this is what love smells like"!