Monday, May 16, 2011

Spring Cleaning

Hello all!
Today we had a young man come in to refresh the domestic flair around our house with paint, various household repairs and an over-all downstairs "face lift". While taking down drapes and curtain rods, I noticed quite an accumulation of , of, well......dusty grunge with a hint of gross. Alas, it seems my house has been harboring unnoticed guests----for a very long time from the looks of it. So, I have decided to take a few weeks away from my blog to do a thorough spring cleaning while walls are bare and furniture is pulled out.
I will return June 6th with fun new projects, summer reading list thoughts, recipes and a vacation frame-of-mind attitude. Please come back to see me and let's talk Summer!
I will leave you with this handy tip that I received from my sweet and quite brilliant friend, Vicki:
The delicate strands of web-like matter lurking in hard-to-reach areas of your home ARE NOT cob webs.
They are called Amish Lace.
Whew, I feel so much better knowing that. Thank you,Vicki!
See you all soon!

Monday, May 9, 2011

Let them eat marshmallows!

Pineapple Pottery Server 
One of my favorite evenings at the Workt by Hand workshop was our "heavy hors d'oeuvres" gathering at the Hotel Gallery in  Tipp City, Ohio. Tipp is a fun eclectic town with antiques, chic shops, good restaurants and very talented craftsmen selling their artwork. It is about 30 minutes north of Dayton. It left an impression on me. I will be returning this summer to do some more exploring! The Hotel Gallery was once a charming old hotel that now houses some of the most beautiful pottery I have seen locally. In addition to pottery, I purchased some lovely hand blown stemless wine glasses. The owner asked if I might like to have my purchased glass filled with wine. Well, yes, I do believe I would!
Jackie, Me and Kim
 A few of us proceeded outside to the campfire ring and were just settled into conversation when the owner came out with a bag of marshmallows and a chocolate bar. Best customer service I have had---ever! My friend, Kim, is the best marshmallow roaster on earth because not one single puff was burned. We had no graham crackers so we attempted to wedge the warm gooey marshmallow between little squares of chocolate without making a big mess. Denied! Lady-like manners were thrown to the wind but we did try. One of our teachers, Alice Strebel,came along to join us. She took a roasted marshmallow and in one impressive motion pushed her square of chocolate neatly into the middle of the melted pillow of deliciousness. Well, I never! Kim, Jackie and I realized that Alice's talent went far beyond her art work. I have forever changed my technique for making Smors! How many of you out there knew to do this? The chocolate was so perfectly melted. I nearly swooned. Forget the food inside.
Roasted marshmallows with chocolate are my new heavy hors d'oeurves of choice. They go quite nicely with a medicinal glass of wine. Really. You must.

Tuesday, May 3, 2011

A good day to Ruche

Today it is cold and rainy so I have a fire in the fire place to chase away the damp and drearies.
This is my buddy, Ky, who is hoping that I will hurry up and sit down for a minute so that she can relax a bit. Today is a good day to play with a new technique (new to me!) that I learned at Workt By Hand. Ruching! Ruche (roosh) is an ancient french technique which means to plait or gather. I am going to give you a little tutorial on this fantastic embellishment.
No sewing machine required!
Basically, you take a strip of ribbon or fabric, place a running stitch through it in a triangular pattern, and pull the thread to gather the stitches. This forms little scallops or petals. Really really simple and so sweet. Ready to try? Here we go!
Click on the pictures if you would like a closer look.

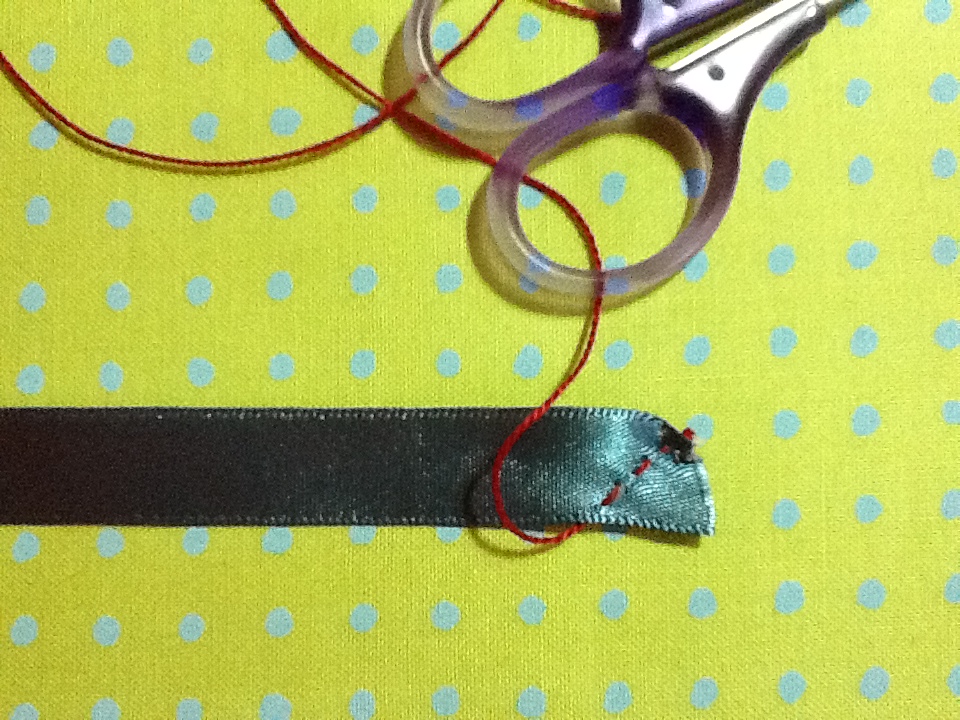
For demo purposes I will use a length of ribbon

1.   Thread a needle with regular thread (color of thread does not matter) and knot the end.
2. Beginning at the top corner, bring the needle up through the back of the strip and sew a basting stitch diagonally to the bottom of the strip. The width diagonally can be wider or narrower depending on how large you want the scallop to be. Note here that I ended my stitch on the back side of the ribbon. I am now going to bring the thread from the back and over the top to begin my next set of basting stitches diagonally back up to the top.
3. See how the stitches form a triangular pattern? Note that here, I have ended my stitch on the front side of the ribbon. Now, I will take my thread from the front of the ribbon under to the backside and begin my next set of stitches. It doesn't matter a bit where you end stitches--either the front or the back--just remember the appropriate starting point for your next stitch set.
4. Every 2-3 triangles you will want to pull your thread to gather the strip. You have just ruched! Continue ruching until you have gathered your strip to a desired length.
Rouching Fabric Strips
If you do not want frayed edges you will need to press and fold your fabric strip to encase the raw edges.

Use the same method of stitching and gathering.
So sweet!

I am using my ruched fabric strips to create little blossoms on my Workt by Hand project.
Here, I have ruched ribbon and couched it with bullion stitches. It is going to be a little tree on another project I am working on. I think the bullion stitches look like little pink and purple blossoms!

I love to ruche. It sounds ever so fancy too.
"What are you doing there, Lisa?"
"Oh, I'm just sipping tea and doing a touch of rouching."
 Thoroughly sophisticated, right?
I just think the possibilities are endless----what have you ruched? I would love to see your ideas!

Sunday, May 1, 2011

Workt By Hand 2011

I have just returned from a fabulous workshop called Workt By Hand. Artists Alice Strebel, Melissa Becker, Sally Korte and Sue Spargo have hosted this workshop for the last nine years. Click on the highlighted names to see their websites. I sure am glad I found out about Workt by Hand in time to go this year! 
The project this year was a wool pillow bolster.The artists designed a general idea and then each of them created their own interpretation of said idea. They did not see what each had created until they met for the workshop. Our challenge---take the same bolster theme, ideas from each of the artists, our own ideas, a lot of fun fibers and embellishments and---fly! All of the women present were incredibly talented and inspiring. Attendees were from places like Australia, New Zealand, New York, Ohio, the Carolina's, Florida....and so forth! I made new friends, ate cupcakes, shopped, stitched and embarrassed myself by missing my chair when I went to sit down. You see, we had just received our surprise bonus project on Thursday night and I guess I was a little excited.  There is so much to share with you that I am going to spend the next week blogging about the event, the town, techniques I learned  that you may like to know and the progress I am making putting my project together.

                         Here are a few tidbits for today:
Thursday's Surprise Bonus Project
 
I really like surprises!
This project is a cute little folk artsy bird needle keep. You can see why I slightly miscalculated my chair landing--especially since, as you can see, coffee and cupcakes where involved.
My project is started!

Close-up of embellishments
This is the way magnolia blossoms look on my planet! And no, those are not eyes-- they are a work in progress. Maybe they will stay, maybe they will disappear--we will see.
I'll be back with more soon!